 |  |  |  |  |


| Walrus |
 Aug 10 2014, 05:37 PM Aug 10 2014, 05:37 PM
Post
#1
|
 ã¡ã‚‡ã†ã¡ã‚‡ã†ã•ã‚“  Group: Angels Posts: 431 Joined: 17-March 07 From: SPACE Member No.: 830 |
This is a topic for model building. Planes, trains, armor, car (more). And I guess gundams+zoids+whatever but that doesn't rhyme with anything.
Post any pictures/logs of stuff you've built or stuff you're building at the moment. Try to keep the same project to one post, unless it's a completely different part of the build(like construction->painting/detailing->displaything). If stuff actually gets posted I'll shove post links/dates into this post. ALSO PEOPLE CAN COMMENT EVEN IF THEY DON'T BUILD. ~~~ COME ON BOYS LET'S GO KILL SOME BOOOOOOAR
|
   |

 
|
  |
Replies
| Walrus |
Aug 10 2014, 06:07 PM
Post
#2
|
|
ã¡ã‚‡ã†ã¡ã‚‡ã†ã•ã‚“ Group: Angels Posts: 431 Joined: 17-March 07 From: SPACE Member No.: 830 |
Here's my log/progress/thoughts on building Tamiya's T-34/76. Using some Tamiya Extra Thin Cement for gluing and plain sprue/wire cutters, hobby knife, tweezers and sandpaper for removal/preparation.
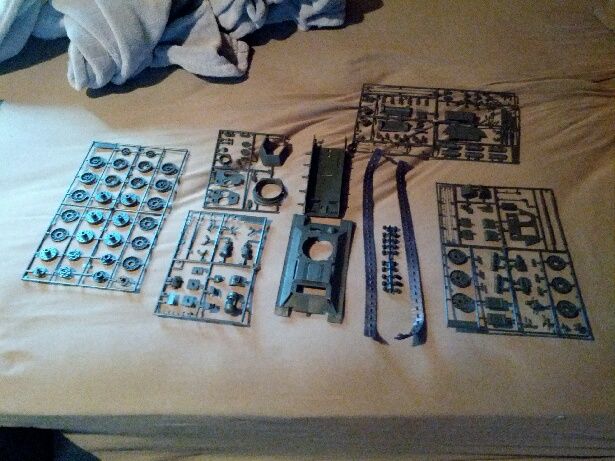
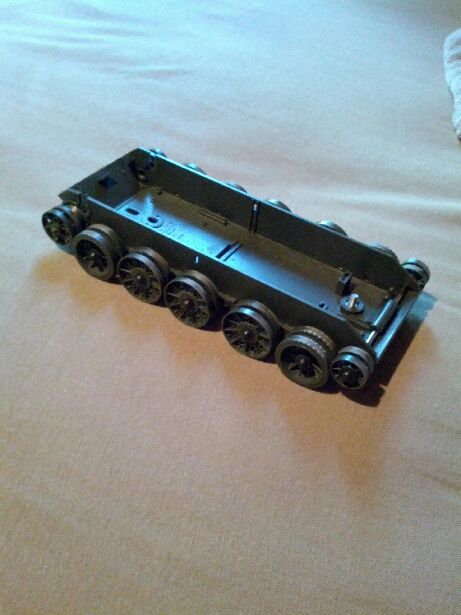
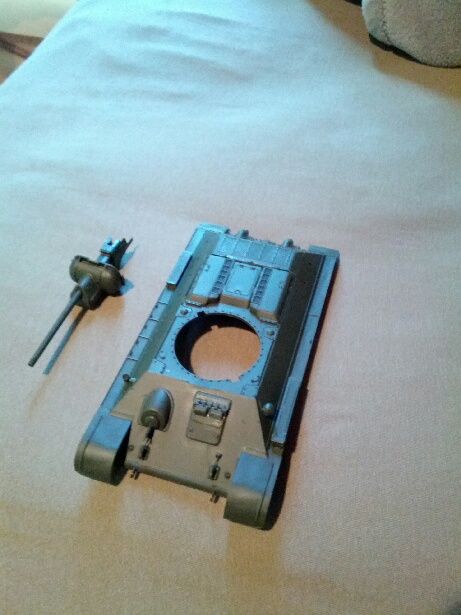
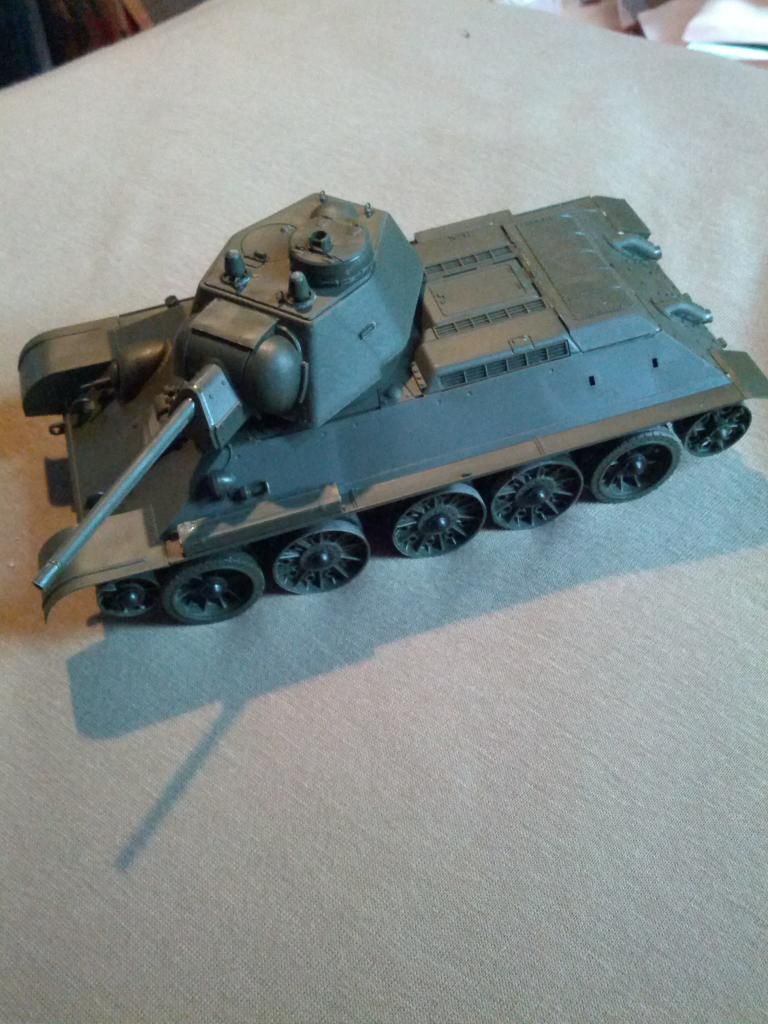
Sprues and stuff: » Click to show Spoiler - click again to hide... « All the bits listed in the instruction booklet seemed legit, so I guess that's good. It also came with a boring decal sheet and some metal rod/screw/nut. And a warning about setting the sprues/yourself on fire. Lower Hull: » Click to show Spoiler - click again to hide... « Completed suspension and whatnot. No idea why the "idler wheels" needed a metal rod held on by a screw, but it's probably something to do with optional RC parts. Maybe. I'm actually not sure how that would even work. All of the wheels are capable of spinning, and held in place by some rubbery knob things instead of being cemented. Upper Hull and Gun: » Click to show Spoiler - click again to hide... « Glued on various detailed bits to the upper hull, and assembled the gun. The gun pieces sort of fit around/through the mantlet, so you can move the barrel vertically a bit(dat Soviet gun depression doe). The venty bits and rear plate didn't really meet the rest of the hull perfectly, but I guess it's not all that important. Also the driver's hatch isn't glued in, and can sort of open and close. Turret Top: » Click to show Spoiler - click again to hide... « Glued all the tiny bits to the top of the turret thing. Using the version with the commander's cupola, because it looks cooler. This was 14 pieces(one's hidden underneath for the silly people figures that I'm not using). And yes, some of them are slightly tilted and there's minor excess glue, I'm not a wizard. LE TONK: » Click to show Spoiler - click again to hide... « Everything basically slammed together after I glued the few edges on the actual turret together, so I just took a picture of that. The top said "just insert," so I haven't glued it, but it wouldn't be that difficult if I had to. No idea if I should glue the hulls together, since they kind of snapped/rubberythingsthatheldthewheelson'd together, and seem sturdy enough... The hobby store I ordered paints from got them in already, so I guess I'll go get those and some primer on Wednesday, and start painting it soon. I'll probably spend tomorrow attaching all of the INCREDIBLY FUCKING TINY handrails and whatnot. Oh, and I have to melt the tracks together. ~~~ COME ON BOYS LET'S GO KILL SOME BOOOOOOAR
|
|
|
|

Posts in this topic
 Walrus LET'S ALL BECOME AMERICA'S NEXT TOP MODEL Aug 10 2014, 05:37 PM
 Rhiannon OH BOY TIME TO MAKE A POST THAT'S BAD AND TOO ... Aug 10 2014, 06:46 PM Rhiannon THIS POST IS FOR ANOTHER ZOID. KOTOBUKIYA'S HI... Aug 31 2014, 08:46 AM Rhiannon Now it is time forrr Kotobukiya's highendmaste... Dec 30 2014, 01:03 AM Rhiannon I'm the only one who posts here so even though... Aug 19 2016, 11:58 AM Rhiannon More things because why not.
The Draken I posted ... Oct 1 2016, 06:06 PM
Rhiannon OH BOY TIME TO MAKE A POST THAT'S BAD AND TOO ... Aug 10 2014, 06:46 PM Rhiannon THIS POST IS FOR ANOTHER ZOID. KOTOBUKIYA'S HI... Aug 31 2014, 08:46 AM Rhiannon Now it is time forrr Kotobukiya's highendmaste... Dec 30 2014, 01:03 AM Rhiannon I'm the only one who posts here so even though... Aug 19 2016, 11:58 AM Rhiannon More things because why not.
The Draken I posted ... Oct 1 2016, 06:06 PM DustyHaru [s]HRESVELGR ATER HAMBURGER HELPER:
Going to try ... Dec 25 2017, 01:07 AM
DustyHaru [s]HRESVELGR ATER HAMBURGER HELPER:
Going to try ... Dec 25 2017, 01:07 AM |
3 User(s) are reading this topic (3 Guests and 0 Anonymous Users)
0 Members:
| Lo-Fi Version | Time is now: 9th May 2024 - 09:33 PM |
Invision Power Board
v2.1.4 © 2024 IPS, Inc.